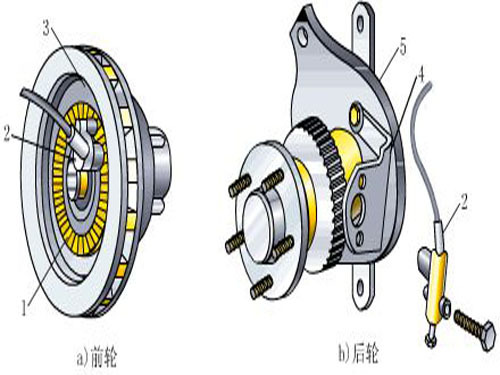
The wheel speed sensors are mainly installed in the main reducer or transmission and can be divided into active wheel speed sensors and passive wheel speed sensors. When the wheel speed sensor encounters the need to be disassembled and installed during use, the user needs to know how to disassemble and install the wheel speed sensor. The following Xiaobian will introduce it in detail.
1, the front end
The removal steps are as follows:
1) The ignition switch must be in the closed position. Remove the key from the ignition switch.
2) Disconnect the negative battery wiring.
3) Disconnect the wheel speed sensor wiring from the anti-lock brake system wiring connector on the vehicle damper. Carefully remove the plastic clip from the shock absorber.
4) Lift the vehicle and support it safely. Remove the front wheel.
5) Remove the wheel speed sensor wiring bracket bolts from the inside of the shock absorber.
6) Remove the wheel speed sensor bolt from the knuckle.
7) Route the wheel speed sensor through the hole in the damper. If you want to use this wire again, do not bend or fold it. Remove the wheel speed sensor and wiring from the vehicle as a whole.
The installation steps are as follows:
1) Pass the wheel speed sensor connector through the hole of the damper and connect it to the anti-lock braking system wiring harness.
2) Mount the wheel speed sensor wiring bracket inside the shock absorber and the knuckle. Do not bend or wrap it around the wheel speed sensor connector.
3) Install the wheel speed sensor into the mounting cavity in the knuckle. Tighten the wheel speed sensor wiring bracket bolts to 7lbf·ft (10N·m) and tighten the fixing bolts at the steering knuckle to 16 1bf·ft (22N·m).
4) Check wheel speed sensor clearance:
(1) Check the pulse generator wheel for damaged teeth.
(2) Rotate the drive shaft by hand to measure the gap between the wheel speed sensor and the pulse signal generator wheel. Rotate the drive shaft completely and check the clearance. The standard gap is 0.02-0.04 in (0.5-1.0 mm).
(3) If the air gap exceeds the standard value, check if the steering knuckle and the pulse signal generator wheel are deformed.
5) Install the front wheel and lower the vehicle.
6) Reconnect the negative battery wiring.
7) Turn the ignition switch to the "ON" position, but do not start the engine. The anti-lock brake light should be turned on. Start the engine and check that the light is off. If the indicator flashes, does not light, or does not turn off when the engine is turning, you must diagnose the system's fault. [TOP]
2, the back end
The removal steps are as follows:
1) Make sure that the ignition switch is turned off and remove the key from the ignition switch.
2) Disconnect the negative battery wiring.
3) Remove the spare cover.
4) Remove the wheel speed sensor connector from the side of the trunk floor under the hinge flap located at the front edge of the luggage compartment.
5) Lift the vehicle and support it safely. Remove the rear wheel.
6) Remove the wheel speed sensor bracket bolt and remove the wheel speed sensor from the rear knuckle.
7) Disconnect the wheel speed sensor connector from the connector on the subframe.
8) Disconnect the plastic clip from the control arm.
9) Remove the wheel speed sensor wiring bracket bolts from the lower arm and the floor of the vehicle.
10) Remove the wheel speed sensor and wiring. If it is necessary to reuse the wiring, do not bend or fold it.
The installation steps are as follows:
1) Mount the wheel speed sensor wiring bracket to the vehicle's control arm and base plate.
2) Mount the wheel speed sensor to the rear knuckle. Tighten the wheel speed sensor wiring bracket bolts to 10lbf·ft (16N·m) and tighten the mounting bolts at the knuckle to 16 lbf·ft (22N·m).
3) Pass the wheel speed sensor connector through the hole in the base plate and reconnect the connector to the connector on the rear suspension and tighten the plastic clips.
4) Check wheel speed sensor clearance:
(1) Check the pulse generator wheel for damaged teeth.
(2) Rotate the drive shaft by hand to measure the gap between the wheel speed sensor and the pulse signal generator wheel. Rotate the drive shaft completely and check the clearance. The standard gap is 0.02-0.04 in (0.5-1.0 mm).
(3) If the air gap exceeds the standard value, check if the steering knuckle and the pulse signal generator wheel are deformed.
5) Install the rear wheel and drop the vehicle.
6) Tighten the wheel nuts to 80 lbf·ft (110N·m).
7) Reconnect the negative battery wiring.
8) Turn the ignition switch to the "ON" position, but do not start the engine. The anti-lock brake system indicator should be turned on. Start the engine and check that the light is off. If the indicator flashes, does not light, or does not turn off when the engine is turning, you must diagnose the system's fault.
9) Reinstall the boot lid.
PVC hollow sheet has good sound insulation effect: PVC hollow sheet can absorb noise or reduce noise passing through when it is affected by external noise such as rainstorm, hail, gale and so on.
Tough texture and high strength: another basic feature of PVC hollow sheet roof is that it must be able to withstand unexpected impact and cannot be damaged by natural external forces.
Volume stability: the PVC hollow sheet has low expansion coefficient and tensile property, which ensures that the geometric size of the tile remains unchanged even if the temperature changes greatly.
Plastic Roofing,Pvc Hollow Sheet,Pvc Hollow Tile,Corrugated Roof Panels
PINGYUN INTERNATIONAL , https://www.pingyunconstruction.com